Rigging and animating a character in four (or eight) directions - Unity 2D Animation
In recent years, Unity has introduced features that allow you to rig and animate a 2d character. You can import a PSD file with separate layers for, say, legs, arms, a head and torso, and then draw bones onto those layers. Unity can then auto-generate meshes that you can later animate by moving around the bones.
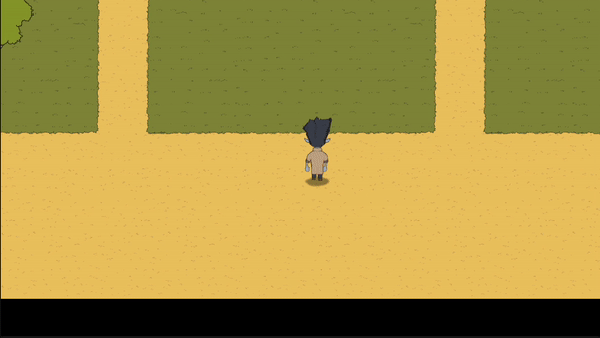
This post explains how to rig and animate a character in Unity in four (or eight) directions, for a top-down game like this:
Most tutorials I have found only explain how to do this for characters that only face to the right or left. When I set out to animate a top-down character in four (or eight) directions, I had to solve a lot of problems, so I am documenting the process here to save you (and future me) some time.
This tutorial is mostly about process and organization, and will not get into great detail about rigging or animating characters. There are plenty of great resources out there to learn the tools discussed here.
A note on requirements: Other than your character drawings and Unity itself, the only app this tutorial requires is Photoshop, or any other app you can use that exports PSBs, also called Photoshop Large Document files. There is a StackOverflow thread here about converting PSDs to PSBs.
Setup
-
Install Unity’s 2D Animation and PSD Importer packages: Window > Package Manager > Change top dropdown to Unity Registry > find 2D Animation and PSD Importer, click Install on the bottom right of the window.
-
At minimum, you should draw a character facing up, down and to the right. You can use your right-facing animation for leftward movement by flipping your sprite in your movement script (see the script example below). If you want to have specific animations for diagonal movement, you can also draw your character facing up-right and down-right, and those can also be flipped for leftward movement. Of course, if your character should look different when it faces left than it does when it faces right, you can also draw your character facing left. You can follow this tutorial whether you’ve drawn your character in the minimum three directions, or in all eight possible directions, and anything in between.
-
Prepare your character by separating each of its moving parts into its own layer. This can include the limbs, head and torso — anything that might move. I generally draw my characters in Procreate, flatten each moving part to individual layers, name the layers, then export to PSD. The layers in this project are a good guide for breaking up a character.
-
You will need a separate file for each direction your character faces. You may think it would make more sense to put all directions into one big PSD, but that quickly becomes a nightmare in Unity. Once your separate PSD files are ready, open them in Photoshop and save them as as PSBs, also called Photoshop Large Document files. Then you can import those PSB files into Unity.
-
After you have imported the PSB files, select them and look at their settings in the Inspector. Make sure the Pixels per Unit value is what you want.
-
Give the PSB files names that represent their directions, like RigUp, RigDown and RigRight.
Rig your character
-
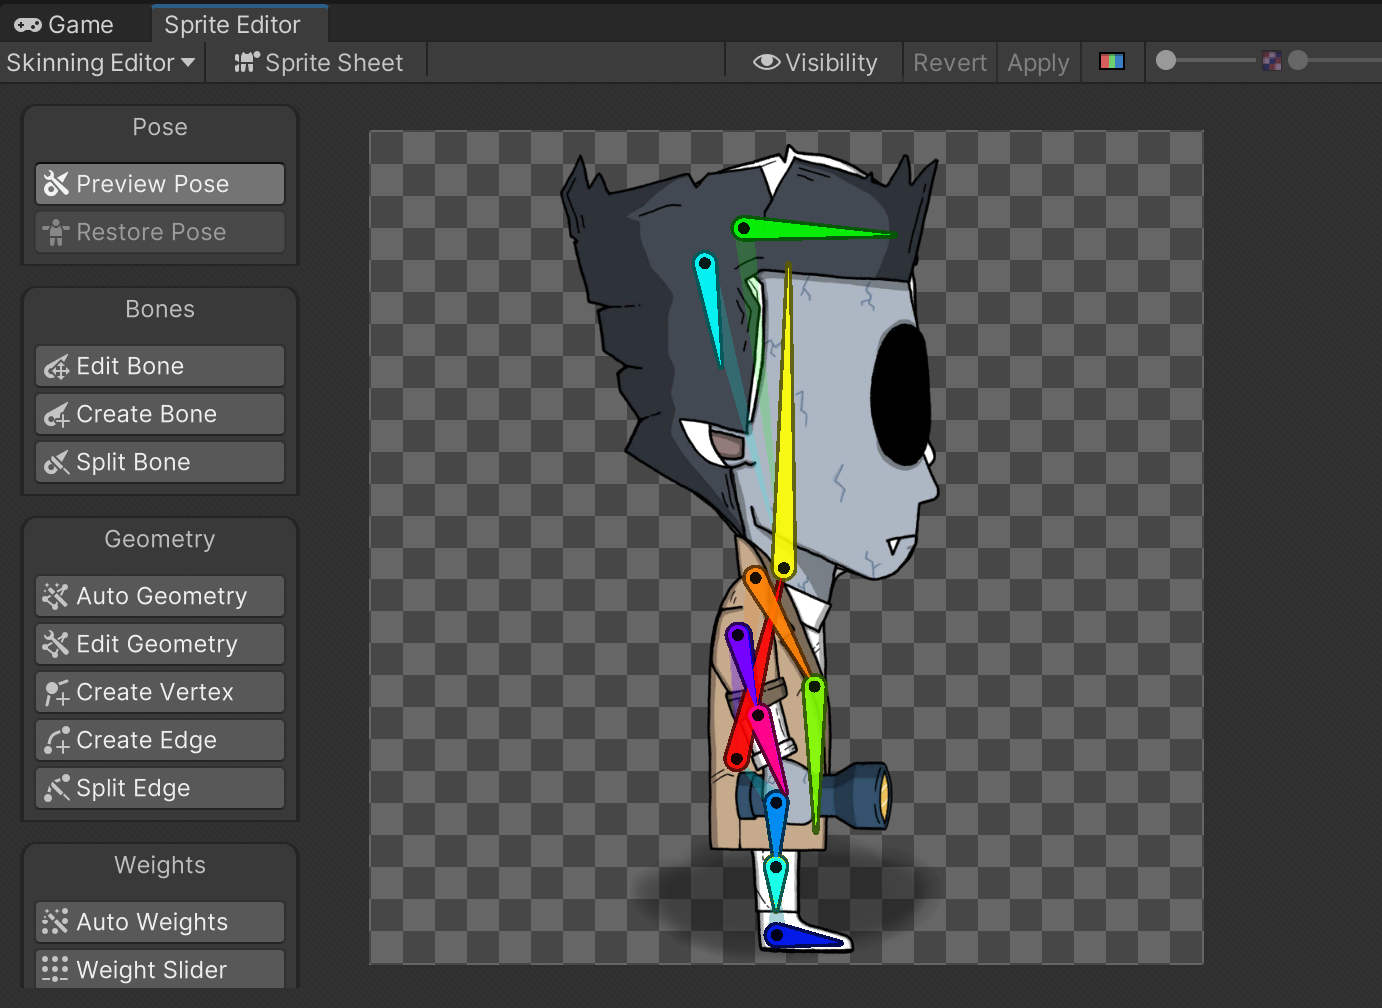
Select one of your imported PSB files and click Sprite Editor in the Inspector, then in the Sprite Editor window, switch to Skinning Editor in the drop-down on the top left.
-
Create bones for each layer or body part that will have to move. Play with splitting and editing bones to get them right. Depending on the complexity of your character, limbs can have one, two or three bones. For this tutorial, I will assume you are using two.
-
Go to Bone Influence, open the Visibility pane and select each sprite and associate them with the bones you created.
-
Go to Auto Geometry, make sure Weights is deselected, and click Generate for All Visible. After that, it’s usually a good idea to click the Sprite Sheet button at the top of the panel to tighten the geometry.
-
Go to Auto Weights, make sure Associate Bones is deselected, and click Generate All.
-
Repeat these steps for each of your imported PSBs, so that you have one for each direction your character is facing.
Bring your character into the Scene, prepare it for animation
-
Create a new, empty GameObject in the Hierarchy. Add components: Rigidbody 2D, Circle Collider 2D (I usually size it as a small circle at the character’s feet), and scripts for input and movement.
-
Drag each of your PSB objects, one for each direction, into the Hierarchy as children of your new GameObject.
-
For each PSB object, add the IK Manager 2D component. This is to help animate legs and arms, since they move in weird and specific ways. If your characters are basic enough that they don’t have elbows or knees (i.e. just one bone for each arm or leg), then you might not need this.
-
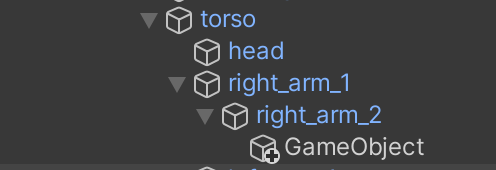
For any limb that does have more than one bone, add an IK Solver, by pressing the + in the IK Manager. Creating a new Solver will add it to the Hierarchy as a child of your PSB object.
-
With a new Solver selected, you’ll need to drag an object to the Effector field in the Inspector. You can think of the Effector as the hand of an arm or the foot of a leg. Your Effector will depend on how you setup the bones for the limb in question.
- If you have a bone for the hand or foot, that bone should be the Effector, and you can drag it into the IK Solver.
- If you have two bones for the arm or leg, and no bones for the hand or foot, you can add an empty GameObject as a child of the bottom-most bone in the limb, position it over what would be the hand or foot of that limb, and use that as the Effector by dragging it into the Solver.
-
Once you have set an Effector in the Solver, click “Create Target.” If it looks weird, select Flip.
-
Repeat steps 4, 5 and 6 for each limb that has more than one bone.
Animate your character
- Select the parent GameObject that holds your PSBs, then go to the Animation pane and click Create. That will attach an Animator to the parent GameObject and create a new animation (an
.animfile, likeWalkRight.anim,WalkUp.anim, etc). It will also create an Animator Controller with the same name as your parent GameObject. The Animator Controller can be opened in the Animator panel, which is where you can create a state machine that defines your character’s movements. More on that later.
Note: For top-down characters, it’s important to keep all animations attached to the parent GameObject. For side-scrolling characters that only face left and right, it is OK to associate animations with the PSB object itself.
-
In the Animation pane, the animation you just created should be ready to go. Arrange panes so you can see the Scene and the Animation pane together. In the Scene view, you should see your character, with the bones you created for it, shown in white. If you don’t see them, check your Gizmo Visibility settings. You can click the bones and move them around to create animations.
-
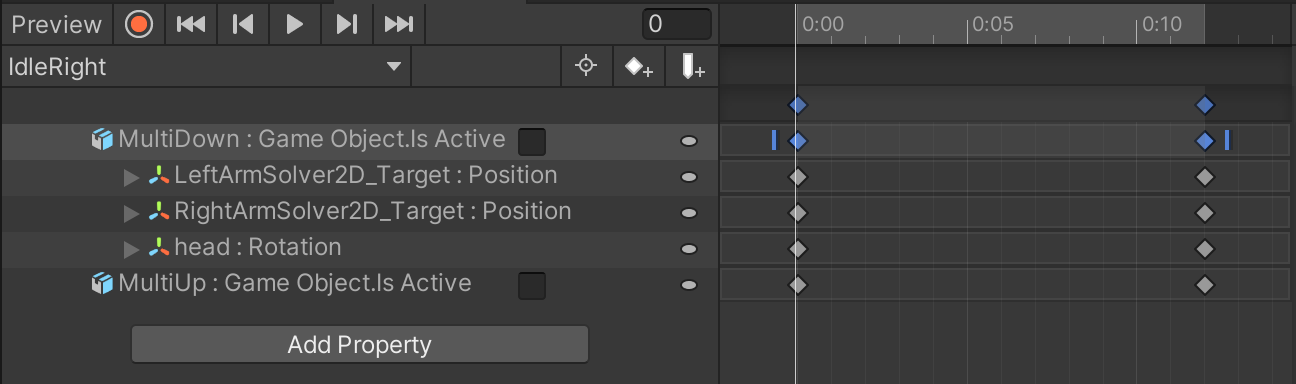
But first, a little more setup is required. Right now, your character probably looks pretty crazy in the Scene, facing all directions at once. When we animate the character, we only want to see one of its directions at a time. That means we will want to hide the directions we are not animating. To do that, in the Animation pane, select Add Property, then find the sprites under the parent sprites that you want to hide, and select the Is Active property.
-
Once the property is added to the animation, uncheck the box. It will look like nothing happened unless you actually click into the animation onto the keyframe that was created. Remember you have to have a keyframe that unchecks Is Active at the beginning AND end of the animation.
-
Now you can start animating your character. If you don’t know how Unity’s Animation tool works, that’s something you should look up elsewhere. But here are the basics: Put the slider at 0:00, press the record button and start animating. Make one pose for each frame, and spread out the frames over the timeline. Mess around until your character looks like its doing something over the course of the frames, like walking or running. When you’re finished, don’t forget to turn off the record button.
-
For this tutorial, it would be best to create idling and walking animations for each of the three directions: up, down and right. Going forward, I’ll assume you have six animations ready: IdleUp, IdleDown, IdleRight, WalkUp, WalkDown and WalkRight. (Remember, for now, you don’t need to make an animation for the left-direction, because the right-direction can be flipped).
An Animator state machine for a top-down character
In this section we will setup a state machine to determine which animation should play based parameters that are set by the player’s input. Some of the steps below are adapted from this helpful tutorial.
-
Open the Animator pane. (You should see the animations you have created within the pane.)
-
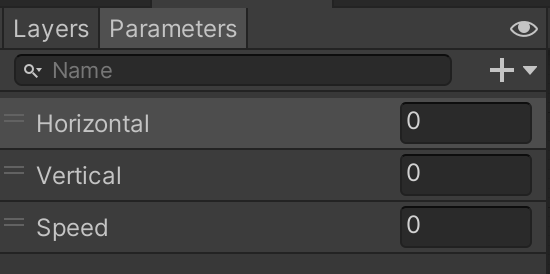
Click on the Parameters tab at the top left of the pane.
-
Add three new float parameters by selecting + > Float. Name the parameters Horizontal, Vertical and Speed. These parameters can be controlled by your character’s movement script, and we will use them here to set conditional animations based on player input.
-
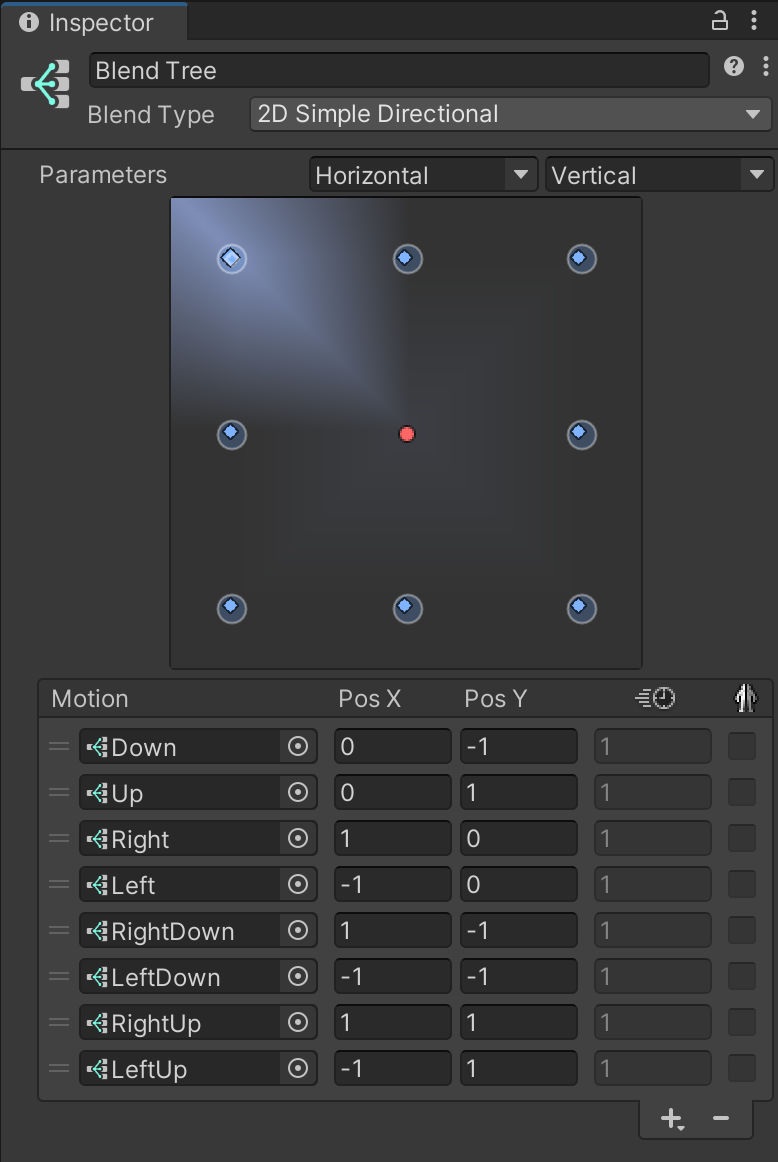
Right-click anywhere on the right side of the pane and select Create State > From New Blend Tree. Click into the new Blend Tree, so that at the top of the pane, you see Base Layer > Blend Tree.
-
Select the Blend Tree node, and in the Inspector, change the Blend Type to 2D Simple Directional. Set the Parameters below the drop-down to Horizontal and Vertical.
-
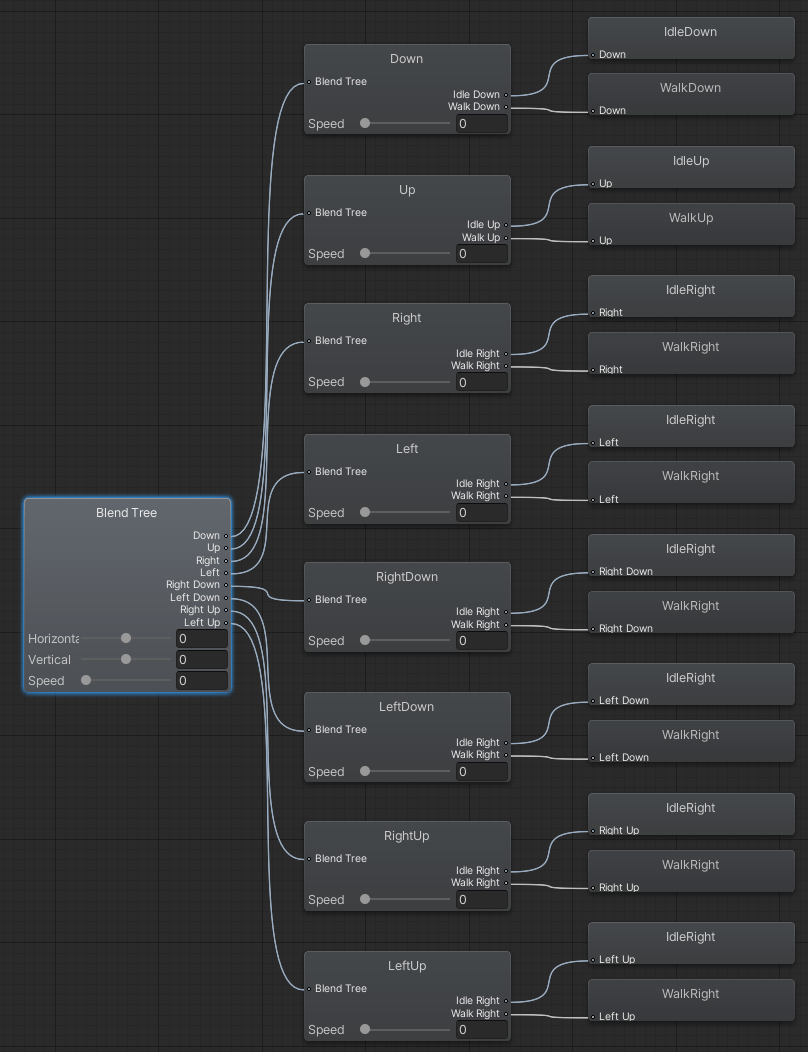
Add eight sub-Blend Trees to this Blend Tree by selecting + > New Blend Tree. Each sub-Blend Tree will represent the eight possible directions in which your character can move based on player input. Even if you are only animating your character in four directions, you will still need to account for diagonal input and movement.
-
Name your eight directions: Down, Up, Right, Left, RightDown, LeftDown, RightUp, LeftUp. Enter values for PosX (Horizontal parameter) and PosY (Vertical parameter), as shown below. You should understand that the values represent directions. If the horizontal axis (x) is -1 and the vertical axis (y) is also -1, that is a left and downward movement, etc. Once you have entered all the values this is what you should see in the Inspector:
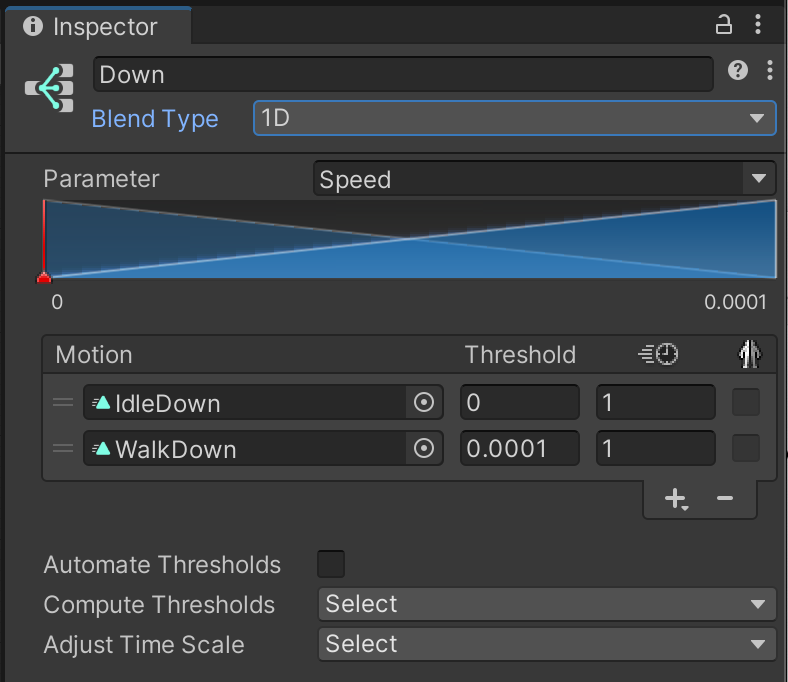
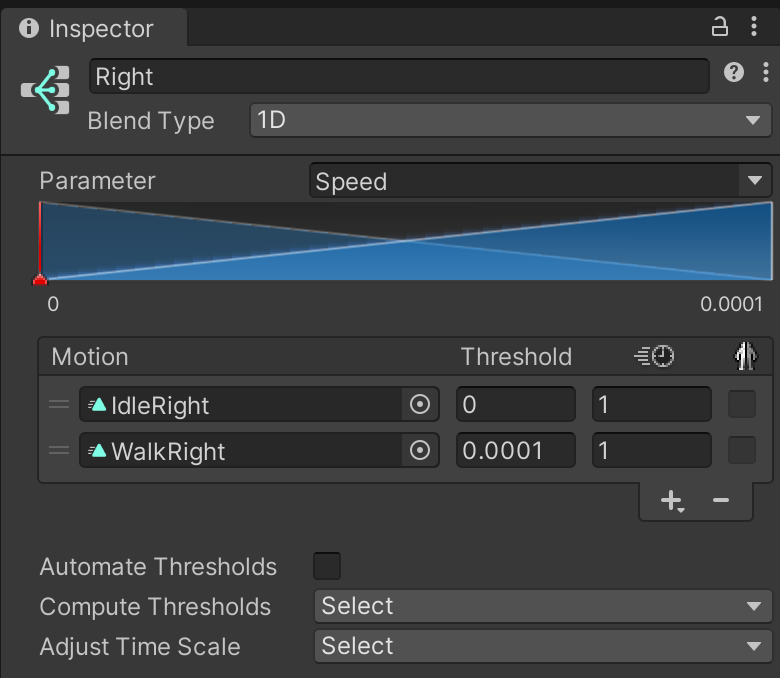
- In each of your directional sub-Blend Trees, go to the Inspector and set the Blend Type to 1D, and set the Parameter to Speed. Add two motion fields by selecting + > Add Motion Field. For each direction, select an idle animation and a walk animation.
- For example, for the Down direction, in the first motion field select the IdleDown animation and set its Threshold to 0, then for the second motion field, select the WalkDown animation and set its **Threshold to 0.0001.
-
What this means is that when the character’s Speed is 0 it should use the IdleDown animation, and when its Speed is greater than 0.0001, which is really any movement at all, it use the WalkUp animation. The Speed parameter, as well as the Horizontal and Vertical parameters, will be set in your character’s movement script.
-
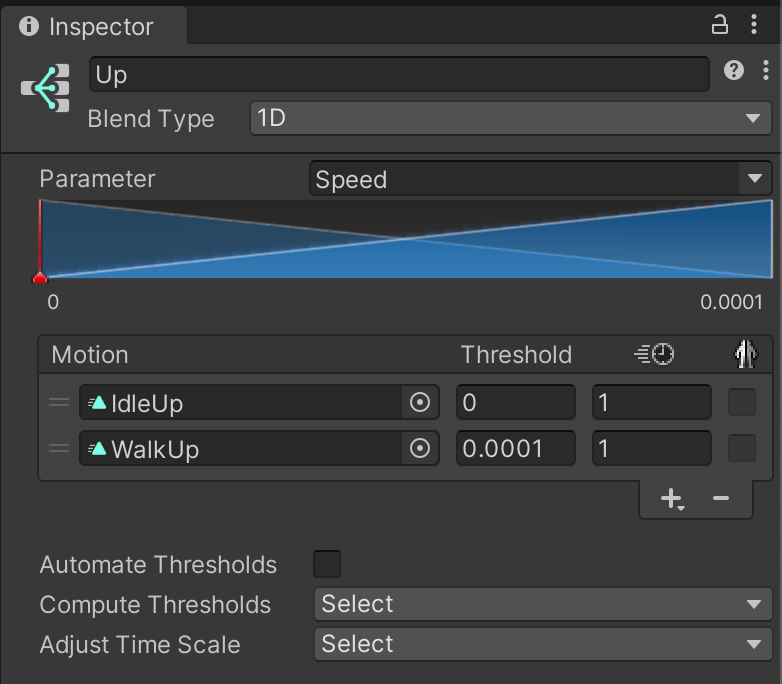
For the Up direction, in the first motion field select the IdleUp animation and set its Threshold to 0, then for the second motion field, select the WalkUp animation and set its Threshold to 0.0001.
- Since we will flip our right-facing animation when the player moves the character to the left, we will set the same motion fields for all of the remaining directions: Right, Left, RightDown, LeftDown, RightUp and LeftUp. For each of those, in the first motion field, select the IdleRight animation and set its Threshold to 0, then for the second motion field, select the WalkRight animation and set its Threshold to 0.0001.
When all of this is finished, your Blend Tree should look something like this:
A basic movement script
Now that you have your character rigged and animated, and parameters setup in the Animator to conditionally play those animations based on player input, you’ll need to create a movement script that sets those parameters and moves your character around the screen.
The script below should do all of that. Attach this script to the parent GameObject that holds your PSB objects, and remember to name your right-facing PSB object RigRight, or this won’t work.
using System.Collections.Generic;
using UnityEngine;
using UnityEngine.U2D.Animation;

public class MoveCharacter : MonoBehaviour
{

	public float baseSpeed = 3.0f;
	public Rigidbody2D rb;

	private Animator _anim;
	private Transform _walkRight;
	private Vector3 _faceRightScale = new Vector3(1,1,1);
	private Vector3 _faceLeftScale = new Vector3(-1,1,1);

	void Start()
	{
		rb = GetComponent<Rigidbody2D>();
		_anim = GetComponent<Animator>();
		_walkRight = transform.Find("RigRight");
	}

	void Update() {
		// Get character direction based on player input
		Vector2 dir = new Vector2(Input.GetAxisRaw("Horizontal"),Input.GetAxisRaw("Vertical"));
		MoveRig(dir);
	}

	public void MoveRig(Vector2 dir) {
		if (dir == Vector2.zero)
		{
			// If character not moving, set its Speed parameter to zero
			rb.velocity = Vector2.zero;
			_anim.SetFloat("Speed",0);
		}
		// Only set directional animation if there's an input direction
		else
		{
			float speed = Mathf.Clamp(dir.magnitude,0.0f,1.0f);
			dir.Normalize();

			// Give the character's rigidbody component velocity so that it moves
			rb.velocity = baseSpeed * speed * dir;

			// Set parameters based on character's current speed and direction
			_anim.SetFloat("Speed",speed);
			_anim.SetFloat("Horizontal",Mathf.Round(dir.x));
			_anim.SetFloat("Vertical",Mathf.Round(dir.y));
			Flip(dir);
		}
	}

	// If character is moving left, flip it to face left
	void Flip(Vector2 dir)
	{
			if (Mathf.Round(dir.x) == -1)
			{
				if (_walkRight.localScale == _faceRightScale) _walkRight.localScale = _faceLeftScale;
			}
			else
			{
				if (_walkRight.localScale == _faceLeftScale) _walkRight.localScale = _faceRightScale;
			}
	}
}